Friday, May 31, 2013

Walking In Your Ancestor's Shoes: The Trek

A few weeks ago, I wrote a post about an activity our church believes all youth should experience. It has to do with the ability to understand some of the hardships our ancestors went through to create a better future for us. (You can see the original post here.)

In that post I explained that my church believes this knowledge is so important, they want all youth to have a taste of what these hardships were like. Learning about the hardships is one thing, experiencing them for yourself is something you will never forget. So, as an organized activity, the teenagers of my church spend a few days recreating the march our pioneer ancestors took on the wagon trains west. Our stake recreates the 'Trek' in less than two weeks!

For the first Mormons traveling west, it really wasn't a pleasant experience. They were forced out of the town of Nauvoo, Illinois in February 1846. Can you imaging starting on this journey in the middle of winter? In addition, many of them lost their homes and many belongings in Nauvoo. They did not have time to sell them - mob violence forced them out. Many left without much money or personal possessions. Approximately 3,000 left that winter. Many others were preparing to leave later in the spring. They tried to sell their possessions but could not. No one would buy them knowing they would be abandoned soon and available for free.

The Mormons who fled Nauvoo set up a temporary camp across the Mississippi river in Iowa. It was severely cold.  For a few days beginning February 24th the temperature was so cold that the river froze. Many were able to cross the river on the ice and join the camp in Iowa. When the winter finally broke, the emigrants started their 300 mile trek across Iowa and then on to Salt Lake. They walked a total of 1,250 miles to reach Salt Lake City.

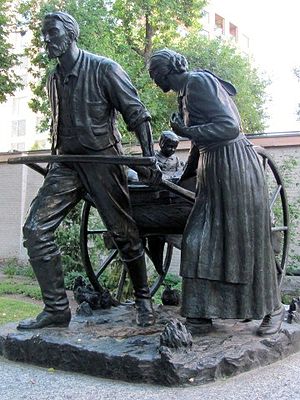
Obviously here in the southeast, in June, we won't have any cold weather. However we will recreate other hardships experienced a few years later on another trek. Some European converts to the church, who wanted to settle in Salt Lake, came to America with very little money. These people had to walk to Salt Lake pulling their belongings in hand carts. No one could afford any team animals to help pull the carts. In addition, the hand carts were not covered as many wagons were. There is one famous hand cart train that experienced extreme hardship on their journey west in 1856. That train was called the Willie Handcart Company and many people on that train did not survive the journey west.  Here is a picture of what the handcarts looked like. This memorial is on Temple Square in Salt Lake City.


For our trek, this is the type of wagon the families will use. Notice there isn't any protection from the elements? We won't have any protection either! (In the cart, many pioneers did have tents to use at night.)

My role in in our re-creation of this experience is minor. I am making a quilt for the girls to tie together while they are in the 'city of Nauvoo' gathering their supplies for their journey. (We are making a mock up of the city of Nauvoo as the start point for their journey.) I will be in Nauvoo helping the families gather their supplies. Then, on day three, I will be in one of the 'camp stops' along the trail where the families will stop to eat and rest a bit. Along with other women, I will be making biscuits in the camp for everyone to eat.

So, I am responsible for making a quilt for the girls to tie together and a pioneer dress to wear in Nauvoo and at the camp. I have made progress on my quilt! Here is a picture of what I have done so far.


The inside squares and the pink border are sewn together. The outside squares are not, they are just lying on the floor in the correct order. I should get them assembled together this weekend. Then I will baste the layers together and it should be ready to go. This quilt will be given to charity after it is finished and the Trek is over.

I have not made as much progress on my dress. I did manage to get the fabric cut out. However, that is where it sits. It is a simple pattern so hopefully it won't take too long to put it together. After I make the dress, I will make an apron and bonnet. I expect to have more time next week so everything should come together before the journey starts.

I will post another update next week to show you my dress!


Take some time to get to know your ancestors. The Church of Jesus Christ of Latter-Day Saints has a FREE web site that you can use to help you locate your ancestors: www.familysearch.org. This web site has all sorts of tutorials and on-line help if you don't know where to start. It has records from all over the world! Anyone, from anywhere in the world with an Internet connection, can access this site to search for their deceased family members. If you want even more help, stop by the family history center at your local church. You do not have to be a church member to use your local family history center. 

Wednesday, May 29, 2013

Garden Update

It has been a while since I posted an update of my garden. The weather finally warmed up and is staying that way! Wow, it's about time! If I wanted cold weather, I would move north!! I am almost ready to harvest all the cool season vegetables that I put in during the month of March. I also started work on some of the summer crops.

The carrots should be ready in about 2 weeks. They can be harvested now but are still a bit small. They are a heat tolerant variety so I am not worried about the warm weather.


The garlic should be ready in about 2 weeks as well. The fact that they look so poorly is a good thing! You harvest them when they fall over and the leaves start to die back.


The peas started flowering about 10 days ago. I should be able to pick some soon. I don't think I will get more than one heavy picking, I need the space for the green beans.


The broccoli appears to be just sitting there. Plenty of leaves but no florets. I may not get any before I must pull it for the summer crops. Broccoli does better in the Fall here.


I had plenty of spinach this year! It was delicious! I did have to pull it this past weekend because it bolted from the heat. Even the heat tolerant varieties don't do well here. They always bolt too soon for me. I am disappointed in the onions I planted this year. The seed germination was spotty. I had a hard time finding day neutral varieties. They are the only kind that seem to do well planted in the early spring. I did purchase some short day varieties, I will plant them this fall and see how they do. The only bright spot is the onion sets that I saved from last year and planted this year are going to flower. I think I will try to save new seed from them.

I got a lot of the summer seedlings planted. Here is a picture of one of my tomatoes. I have 14 plants this year.


Some of the peanuts made an appearance this weekend! Germination is spotty for now - today I noticed a few small holes where I put a seed. Some creature appears to be eating them! I believe it is the chipmunk I saw sitting on my patio last week. I will replant and cover with some fabric to give the seeds time to germinate. Once they germinate, they will be fine. The plants are not bothered by pests or small animals. The biggest threat I will then have is the Mollydog sitting on them this summer. For some reason, she really likes laying in the peanut bed!


I also added some new strawberry beds.


My new apple trees are producing a few apples. They are super cute! I don't have many apples but that is because the trees are still babies. Here is a picture of one. 


Just put the parsley in the ground yesterday. I have 11 new parsley plants this year. I also have some parsley from last year ready to flower. I should be able to save some seeds from it for next year. I am going to have to sprinkle chili pepper powder on them this summer to keep the bunnies from eating them - I planted them all in the front yard. Still working on the rest of the herbs. Tobacco, established strawberries and blueberries are all doing well for now! I will post pictures of them next time!

If you have a garden question, I would be delighted to help! Send me an email or post a question in the comments below.

Happy Gardening to you!

Monday, May 27, 2013

Happy Memorial Day!

I hope everyone here in the US is enjoying this Memorial Day. Please be sure to thank a veteran for their service! And remember, freedom isn't free.

Friday, May 24, 2013

Make a Rainwater Collection System: Part II

This post is a continuation of the series Making a Rainwater Collection System. In Part I, I showed you how to create a level stand for the rain barrel to sit on. For a long term use (such as the entire summer season) it is really important that the rain barrel sit on a level hard surface. You don't want the thing to tip over when you go to turn the faucet open! It is also important to raise the barrel up off the ground so you have access to the faucet at the bottom. If you missed the first post that shows you how to do all that, you can see it here.

Today, we are going to install a gutter downspout that is attached to the gutter system on the house. It is super easy! I made mine a temporary downspout. When the summer season is over, I plan to remove it and put the original downspout back up. Let me show you what I did!


First, I had to go to the home improvement store to get a new downspout. I wanted one of the flexible pieces so I could shape it the way I wanted it. I needed a long piece, about 7 feet. The only pieces I could find in white were about 4 feet long. I thought about linking two sections together but the ends were not made for that. I could only find the right size in black. It wasn't expensive at all, about 9 dollars total. So, I bought the black one with a can of white spray paint.

To start, I had to remove the permanent downspout. It could not have been easier - I removed one screw and pulled the top piece off. Here is a picture of the screw that had to come out.


Once I removed the upper section, I measured where the hole was drilled for the current downspout and then measured it out on the new one. I didn't bother to pull the drill out (that uses electricity!), instead I used a hammer and nail to make a new hole. It took about 15 seconds. I put the downspout on a block of scrap wood and drove the nail in. Here is a picture of the old piece next to the new piece.


Then I tested the new piece in the gutter opening, making sure it fit well.


Added the downspout to make sure the size was correct and that I had plenty of extra to shape it the way I wanted it.


Notice here you can see the permanent downspout still attached to the house with just the top section removed. I played around with the shape of the pipe for a few minutes until I found something I liked. Then, I took it down to paint it. 


Paint one side, let it dry, then paint the other. I used a paint and primer all in one. It was specifically made for plastic.


Once dry to the touch, I reattached it to the gutter opening. However, I found that I didn't like the shape I made. It looked 'weird' and wasn't shaped like the other downspouts. I readjusted it so it's shape better matched the other downspouts on the house. The only problem with doing that was it exposed some areas that were not painted. I had to do some touch up painting after it was installed. It really wasn't a problem - I held a piece of cardboard behind it as I sprayed, so I didn't get any on the house or siding.

To make the new piece look like all the other downspouts, I decided to use some of those plastic cable tie straps and strap the new piece to the existing downspout. This will give the new piece better support and when I am ready to remove it, I can just cut the ties off. Next year, I will repeat the process. 

Lastly, I needed to check to make sure the piece didn't look 'weird' from the front of the house. If it looked too 'out of place' the neighborhood association would send me a letter telling me to remove it. Here is a picture from the front of the house. The rain barrel is on the back corner of the house behind the fence.


I think it looks just like the other one in front! My guess is no one is even going to notice that it is attached to the rain barrel! That is just the way my neighborhood association likes it! 


Super easy to do and it wasn't expensive either! You should consider installing one. The best part is you can save all kinds of money and/or water this summer and still have a wonderful garden!

If you like this post, you may also like:


Wednesday, May 22, 2013

Cooking with Food Storage: Sour Cream Pound Cake

I got this recipe from my friend, Chef Tess. It is in her new cookbook, The Gourmet Food Storage Handbook. It is on page 200. (Link to the book is on the left in the Amazon.com box as well as at the bottom of this post.) When I first bought her book and did a book review (you can see that here) this cake was the first recipe I wanted to try. I have been quite busy the last few weeks and this cake has been on my mind. I am glad I finally got to make it! In her book, Stephanie's cake is a lemon sour cream with mixed berry cream glaze. This post is my interpretation of Stephanie's recipe.

Let me start by saying that I didn't have the correct ingredients to make a lemon cake so I substituted orange instead. Here is a picture of the final results.


Here is the recipe with my changes:
1 box of yellow white cake mix (In her book, Stephanie uses 4 1/2 cups of Honeyville yellow white cake mix).
3/4 cup lemonade powder (I substituted orangeade powder instead.)
1 cup powdered sour cream
1/2 cup powdered eggs
2 cups water

Even though I have been thinking about making this cake for a few weeks, it never occurred to me to check to see if I had a box of cake mix in my food storage! I didn't. I can't believe it, I am all ready to make the cake and no cake mix!! No need to worry, I have been a reader of Stephanie's blog for quite a few years. I remember that she had a homemade version of box cake mix on her blog. (You can see the original post here.) So, instead of using a box of cake mix, I made my own. Here is my interpretation of Stephanie's box cake mix recipe:

2 1/4 cups all purpose flour (I used half all purpose and half whole wheat.)
1/4 cup cornstarch
1 1/4 cups sugar
1 TBS baking powder
1/2 TBS salt
1/2 cup shortening or butter. (I used shortening. You can also use powdered butter or powdered shortening.)
1 TBS double strength vanilla (I forgot to add this - next time I will.)

The ingredients listed here are the equivalent of one box of cake mix. I started by mixing all the dry ingredients together. Then I added the shortening.


Stephanie said you can use a Kitchen Aid type mixer to blend it all together if you want to. For those who have been reading my blog for awhile, you know I don't have any electrical kitchen appliances, so I cut mine in with a knife. It didn't take very long. Here is a picture of mine almost done.


Once I had my 4 1/2 cups of cake mix,  I added the rest of the ingredients to make the sour cream pound cake. Stir each ingredient in well and eliminate any lumps you see as you stir it. Pay special attention to the powdered eggs because they tend to have a lot of lumps. When finished and you have eliminated all the lumps, add the water and mix by hand for 200 strokes.


Grease and flour a 9 inch-bundt cake pan. Pour the batter in and bake at 350 degrees for 55-65 minutes.  It was early evening when I made this cake and I did not have enough sun left in the day to use the Sun Oven. I used the kitchen oven instead. Mine baked for one hour. Let it cool in the pan for 20 minutes before inverting. Here is a picture of mine when it was done.


While the cake was cooling, I made the glaze. In Stephanie's book, the mixed berry cream glaze uses the Honeyville wild berry smoothie mix. I must say, I have this mix and it is fabulous! However, I didn't think it would go well with an orange cake so I omitted this ingredient. Here is the recipe for the glaze with my changes:

1/2 cup margarine powder (I used butter powder.)
1 scoop of Honeyville wild berry smoothie mix (I omitted this.)
1/4 cup lemonade powder (I used orangeade powder.)
1/2 cup powdered sugar
1/4 cup hot water
1 tsp vanilla
1 tsp orange flavoring (This is not in the original recipe but I added it in place of the smoothie mix.)

Combine the dry ingredients and run through a sifter if necessary. I eliminated the lumps by hand with a fork. Add the hot water, vanilla and orange flavoring. Stir until smooth.

Drizzle glaze over the cake. Have a slice!


Wow, was it good!


Monday, May 20, 2013

If Aliens Ever Come To Earth...

They will know immediately who is in charge at my house - and it ain't me!  J


Friday, May 17, 2013

Make a Rainwater Collection System: Part I

Making a rainwater collection system is easy! Don't believe me? I made this one by myself, no help at all! (My husband was out of town on a business trip.) Not only was it easy, it wasn't expensive to install.

The most expensive part was the rain barrel itself. However, it doesn't have to be! You might be able to procure one for free (or a greatly reduced price) from a local business. Mine has a faint scent of orange fruit drink in it. I had to order it online and it was a bit pricy, but I didn't have any local options at the time. I got mine from here. Wherever you get yours, just be sure to get a food grade barrel. If you get a barrel from a local source, you may have to add your own faucet and downspout opening. Mine came installed.

After the barrel, it only costs a few dollars more for set up. The first thing you need to consider is where you are going to put it. Then, you will need to make a platform for it to stand on and hook it up to your gutters. I will show you how to do this in a two series post. Today, we will talk about how to make the platform. Next Friday, I will show you how to hook it up to your house gutters.

Put it in an out of the way place, next to one of your downspouts. To keep it steady, you will need to place it on some sort of platform. You will also want to raise it off the ground a bit so you can get to the faucet. I used cinder blocks. If your ground is even, you can just lay the blocks down and set the rain barrel on top of them. My guess is the ground won't be perfectly even so you will have to level it. It is not hard to level the ground! I bet most women think they can't do this themselves. If you can level cake batter in a pan, you can level dirt!

Start by digging a shallow hole. Make sure the hole is big enough for all the blocks. Here is the start of mine.


I dug down about two inches because my ground isn't level at all here. Now, even out the bottom of the hole. Eyeball this. You don't need the level yet. Add some sand at this point. Sand is easier to level then the soil. I went to the store and bought sand the morning I did this. However, by the time I got to this chore, I was out of sand. My sand went to refresh the peanut bed. (I will be planting peanuts next week.) So, my sand was put to a good use, I just expected to have a little left over for this project as well. It didn't happen. I bet you will agree that the peanut bed looks nice, though!


Anyway,  I can't stand going to the store so I knew I was not going to go back to get more sand!  Since it had been raining so much, the soil was quite moist and it all worked out just fine without the sand. I do believe though, the easiest thing to do is to get some sand. You don't need much. Pour it in and level it out. At this point, eyeball it to see if it is level. Just like you would do with cake batter.

Lay the first block and tamp it in a few times to settle it. Don't have a compactor? Neither do I. Jumping up and down on the block a few times will work. Check to see if it is level or how far off you are. I am sure it won't be perfectly level the first time you put the block in. Find the low spot, (or high spot), remove the block and concentrate on reworking the sand at that spot. Lay the block and try again. Not only should the block be level, but it shouldn't move either. No tipping allowed, it should be flat and not move when you press on any corner. If it does, pull the block and level the sand again. I had to add more soil to one side of mine.


I promise it won't take very long to get the block settled. Then, add the next block. Make sure it is firmly set against the first block. Tamp it in and check to make sure it is level. Not only does the second block need to be level on it's own, but the two blocks together need to be level as well. Remove the block and redistribute the sand as necessary. Continue until you have added all the blocks, and they are firmly seated. There should be no gaps between the blocks and none of them should be tipsy. Here is a picture of mine.


Now, back fill around the blocks. I am sure you will have extra spacing around the edge of the hole you dug. Carefully fill it in and press the soil down with your foot. I also added some dirt in the spacing inside of the cinder block. Here is a picture of mine.


Notice my blocks are not sitting directly against the house. That is because my house was built on a slab of concrete. I don't have a basement.  The back block is against the edge of concrete slab and as close to the house as I can get it. Check again to make sure the blocks didn't move as you backfilled the soil. Everything should still be level. Check each block individually and where the block touches another block.  If any one block (or more) moved, you may have to pull the uneven block(s) and do it again.


Clean up and place your rain barrel on the blocks. 


Total time, start to finish, was about one hour. That included the 10 minutes time it took for me to locate my level. Next week, we will add the downspout!


If you like this post, you may also like:

Wednesday, May 15, 2013

Cooking with Food Storage: Turkey Noodle Skillet Meal

This is a meal out of The Gourmet Food Storage Handbook written by my friend Chef Tess! Turkey Noodle Skillet Meal is on page 54 of the book.  (Link to the book at the bottom of this post.) This post is my interpretation of Stephanie's recipe.

I made it a bit different from the directions in the book. I didn't use any heat source to simmer the pan. I did something different instead:
  • Boiled water using my kelly kettle (You can see here how to do that.)
  • Insulated the pot using a variation of the Hot Box. (You can see here how cooking with a hot box works.)
Here is the recipe as it is listed on page 54. My changes are next to each ingredient:

2 cups noodles (I used two different kinds of noodles because that is what I had leftover.)
1/2 cup freezed-dried vegetable mix (I used carrots and broccoli because that is what I had opened.)
1/3 cup cheese sauce powder (I used 1/2 cup.)
1/3 cup powdered milk 
1/4 cup powdered butter
1 cup freezed-dried turkey chunks
1/2 cup freezed-dried mushrooms (Since my husband doesn't like mushrooms, I didn't have any so this was omitted.)
1 TBS dehydrated onions
1 tsp Italian seasoning (I only glanced at this and I thought it said 1 TBS so that is what I added!)
3 1/2 cups water

Even though the recipe says it is a 'skillet' dinner, I added all the dry ingredients to a saucepan. 


Then I went outside to get the boiling water from the Kelly Kettle and added it all at once, stirred briefly and covered.


If you are not using the stove to heat the pan to boiling, this next step is critical. Immediately cover the pan with an insulating cover. I used towels. I didn't bother to go get my hot box because I was in the middle of a work project. I just used two big beach towels.


Stephanie's instructions say, once the water is boiling, turn down the heat and simmer 10 - 12 minutes. I checked mine at 12 minutes but the noodles were not ready. So, I stirred it, replaced the cover and rewrapped the pot with the towels. Total time I let mine sit was 30 minutes. It was still nice and hot when I served it.


I thought the turkey and cheese sauce tasted wonderful! However, when I make it again, I will change the vegetables to something else. My husband said he didn't care for the freezed-dried broccoli. I must agree that peas and carrots would have been a better choice. My husband still managed to eat it anyway with some parmesan cheese on top!

I think this recipe is a winner! I am going to make up some 'Meals in a Jar' with the rest of the turkey next week!


Monday, May 13, 2013

Got Ladybugs? You Have a Healthy Garden!

Most novice gardeners reach for a chemical spray when they first see bugs in their garden. Spray with insecticide and you will eliminate all the bad bugs. The problem is you will eliminate all the good bugs as well. Then, in a few weeks you will find the bad bugs returning (sometimes in even larger numbers). What do you do then? Reach for the spray and the cycle starts all over.

Spraying chemicals is actually one of the worst things you can do for your garden. Ideally, you want to have both good bugs and bad bugs. The good bugs will keep the bag bugs in check for you. The best thing to do for your garden is to plant things that will attract the good bugs. For example, there are quite a few good adult insects (lacewings and hoverflies come to mind) that feed on the pollen and nectar of flowers. However, the young nymphs feed on bad bugs.

In my garden, the bug that is the star of the show this time of year is the ladybug. I love these bugs! Usually, the first bug of the year I see is aphids. The second is ladybugs. I am always reminded to remain patient as I watch the aphids try to eat everything I treasure. Currently, they are in my irises, strawberries, grapes and apple trees. At about the time I lose patience with these critters, I start to see the glorious ladybugs do my work for me!

Ladybugs on my irises.

Ladybugs on my apple trees.

Ladybugs love to eat aphids. It doesn't take many of them to eliminate the aphid problem in my yard. Patience is the key here. It will not happen overnight, but it will happen. To help encourage the good guys to show up and do their work, plant some lovely flowers. A mix of flowers is best but here is a list of some of the ones the good bugs seem to love:

  • Herbs such as dill, caraway, yarrow and fennel (plant some for you and a few extra that you can let go to flower for the good bugs)
  • Geraniums
  • Lilies
  • Tulips
  • Cosmos
  • Zinnias
  • Sunflowers
  • Marigolds
  • Daisies
  • Angelica 
Ideally, the flowers should have different bloom times. That way you can continue to attract them all season long. This brings me to another point. Sometimes you see ladybugs for sale in seed and plant catalogs. In my opinion, purchasing bugs is a waste of money. If the good bugs can't find anything to eat in your yard, they will leave. So if you purchase them and don't provide any food, all you did was help your neighbors who did provide food. And if you are going to provide food for the good bugs, you are going to attract them naturally anyway!

Plant flowers instead! Beautify your yard and help to keep the bad bugs at bay! This will require less work and less money in the long run. You will truly have a garden in balance.

Friday, May 10, 2013

99 Frugal Ways To Make Your Life Easier!

I saw a web page earlier in the week that blew me away with good ideas! Best part is most of these ideas are quite frugal because they reuse things like plastic milk/juice jugs, bread clips, toilet paper & paper towel rolls, soda can tabs, pool noodles and even stale leftover doritos!

Over 95% of these ideas were new to me. I had only heard about a couple of them before and I found that I am only use two of these ideas now. Print this one out because it is a wealth of information!

99 Life Hacks to make your life easier

Enjoy!

Wednesday, May 8, 2013

My Reflections on Blogging

I really can't believe it has been a year since I started this blog! Truly, blogging is fun. Learning about new things and sharing information with like-minded readers is quite rewarding. Although, compared to some blogs I read, my page count is quite low (for now anyway). However, I am very proud of the 25,000 page views I have received in the past year. I feel truly blessed that people find what I have to say informative and entertaining.

My one year as a blogger has also taught me some things about blogging that I had never even considered before. The biggest being the amount of time it takes to plan and write blog posts. When you include time to plan and take pictures as well as updates and necessary changes to the page layout, you are looking at a part-time job of about 15 - 20 hours a week.  

I have been an avid reader of blogs for well over five years. I never could understand why people who have had their blogs for awhile include advertising. I now have a much better understanding of the time (and money) it takes to run a blog! Domain names, a new camera lens and photography software were all things I had to purchase this past year to support this blog. I never thought about things like this when I was just reading other blogs.

Now that I have a more realistic understanding of the costs and time involved in blogging, I can see why other bloggers leverage advertising to help defray costs. I have decided to do that as well. I am going to be an Amazon.com affiliate to start. I expect to add other company affiliations later (for products I believe in, use myself, and often feature on this blog.) My intent is to highlight only those products I think you will find useful. Hopefully, this will give you access to products that will help you progress on your journey toward self-reliance. When you click on an affiliate link, it will not cost you anything extra, but will provide a few cents to help support the blog.

On another note, I have also started a Facebook Fan page!  You can see the link on the upper right of corner of this blog. This page will allow me to share short tips and ideas I have tried (or read about) that don't really need a long blog post to explain. I expect to share ideas on Facebook two to three times a week. 

Please be sure to like us on Facebook so you won't miss a thing! And, if you decide to purchase something I talk about here, please use my Amazon.com link to purchase it. It will help me keep the blog posts coming year after year!

Monday, May 6, 2013

Ice Cube Trays Can Save You Money!

Do you have any ice cubes trays? Many people don't because most all refrigerators now have automatic ice dispensers. I do have ice cube trays - quite a few of them! My old refrigerator (I got a new one this past Black Friday) didn't have a working ice dispenser for the last five years I owned it. I was always making ice! I didn't toss those ice trays, I dutifully put them in the back of the kitchen cabinet even though I wasn't really sure when I would put them to use again.

Last week I was reading a post on The Parsimonious Princess about all the things you can do with ice cube trays to help you save money! All I can say here is no one person has a monopoly on good ideas! We can all learn from each other, and last week I learned how to squeeze a bit more out of my food budget by using ice cube trays! Wow! I pulled those trays out and immediately put them to work! 

Heather suggested you put leftover items in the trays to help with single serving uses. She recommends doing this for things like baby food, tomatoes, herbs, applesauce, chicken stock and more! She even has a link to other things you can use ice cube trays for. You can see her post here.

This got me thinking about what else I could use the ice cube trays for. This is the list I came up with last week:
  • Ketchup - this is a big waster in our house. I can my own, and we never use it all. We tend to use very small amounts when we do need it. The ice cube trays to the rescue! Individual cubes provide just enough ketchup for our needs and I don't waste any! 
BTW - homemade ketchup tastes better than anything you could buy at the store and it doesn't have any preservatives either! Since it doesn't have preservatives, the amount left in the jar won't last in the refrigerator like store bought does. The ice cube tray is the perfect answer!
  • Cookie Dough - I made a batch of whole wheat chocolate chip cookies (made with M&M's) for my husband. He only wanted a few and I knew the rest would not be eaten (or even worse - eaten simply because they were there). Instead, I put the dough in the ice cube trays! Once frozen, I moved them to a freezer bag. Next time someone wants a cookie, I can pop out some of the frozen cubes and bake them up without a fuss! If you are interested, you can see how to make the best ever whole wheat chocolate chip cookies here.
  • Preserves - I don't buy preserves. I don't like the store bought kind. I make my own. However, my problem with the preserves is the same one I have with ketchup. I use it for a few days, then I don't want to eat it again for a while. Without preservatives, the jar doesn't last long and usually ends up getting tossed. Then when I am ready to eat it again, I open a new jar and the process starts all over. So, last week I took the rest of the jar that was in the refrigerator and spooned it into the ice cube trays. Once frozen, I moved it to a freezer bag.  I haven't thawed any yet so I am not sure if the texture will come back. I will let you know what happens when I do. However, since I waste so much of this, I thought it was a good idea to give it a try.
  • Beef Broth Treats - This one isn't a new idea for me but I thought I would mention it. I usually make these every summer for Molly. She loves them when it is hot outside! I make the broth and separate out a cup (or so) for Molly. I usually add an equal amount of water and then freeze the mix. Note of warning if you make these - give them as a treat outside. Molly will roll the ice cube around in her mouth and make a big mess! No cleanup needed when she enjoys them outside!
I am going to be on the lookout for more things I can freeze in ice cube trays. If I can get more uses out of what is in the jar instead of pouring it down the sink, perhaps over time I will need less jars. Not only will this save money, but it will save me time if I don't have to can as many jars in a year.

How frugal is that!

Friday, May 3, 2013

Making Applesauce

I usually make applesauce in the fall, when the apples are plentiful and cheap. I get quite a few bushels of apples and can up enough for the entire year.

With that in mind, I went looking for some applesauce the other day to eat with dinner. I searched and searched and searched but could not find any. I finally realized I am going to have to break down and purchase some apples at the grocery store and make some more. My problem with apples from the grocery store is they are expensive! I am still looking for that missing box of applesauce jars but in the meantime, I will have to make more.

Making applesauce is easy and it doesn't have to take very long either. Coring and peeling the apples is super fast and easy with my Victorio Apple Peeler! Here is a picture of mine. 


This tool has been around for over 100 years so I am sure your great-grandmother used one as well! Start by pulling the handle all the way to the rear. Then place the apple on the prongs.


Turn the handle and watch!


I timed how long it took to core, peel and slice an apple, 15 seconds! There is no way you can do it by hand that fast! I had the five pound bag finished in less than 10 minutes. 


Once the apples were peeled, cored, and sliced, they need to be treated to prevent browning. I use ascorbic acid. Lemon juice and vitamin C powder work too. I put a heaping 1/2 tablespoon in a large bowl and added room temperature water. It isn't necessary to have the apples soak in this, just dipping them works.


At this point, there are a couple of ways to cook the apples. You can put them in a large sauce pot and bring them to boil. Then, turn down the heat and cook for 20 minutes. You could also put them in a crock pot overnight and let them cook slowly. I wanted to cook mine in the Sun Oven, however for the last two days we haven't seen the sun! So, I opted for slow cooking in the crock pot overnight. 


When cooking the apples, all the recipes I have say to add a little water to the bottom of the pot so they don't stick. I don't like to add water, so I used apple juice instead. I used apple juice I canned myself last fall.


Although it isn't really necessary, at the four hour mark, I stirred the apples and then used a potato masher to mash them up a bit.


You could wait until they are completely cooked and then puree them into sauce. We like chunky sauce so all I do is mash them - I don't bother to puree. This is also the time that I add the sugar and spices. I use the following spice mix. It is set for 10 pounds of apples. Since I only had five pounds of apples I cut the amount shown here in half:

  • 2 cups of sugar (You can use less if you want.)
  • 2 tsps of cinnamon (Cinnamon doesn't like me, so I usually use apple pie spice instead. This contains a bit of cinnamon so you still get the flavor but it doesn't overwhelm.)
  • 1/2 tsp of nutmeg

 Here is a picture of mine the next morning.


It's done! I didn't bother to can this because I really didn't make enough to justify all the work involved in canning. I separated it into portion size containers and put it in the freezer. 

This fall, I am definitely going to can many more jars of applesauce so I don't run out again! Believe me, once you taste homemade applesauce, you won't ever buy it from the store again!

Wednesday, May 1, 2013

Repairing a Rag Rug

Ideally, I would first show you how I make a rag rug before I show you how to repair one. However, sometimes life gets in the way of what would be ideal. That is what happened in this case. I really don't have a need for new rugs - so I haven't made any in a few years. I did have a need to repair one.

My guess is, if a rug gets damaged in a normal everyday household, it would get thrown out. Not so at my house! I just can't bring myself to waste the rug just because it has a bit of damage. My answer is to repair it. However, it is difficult to repair it if you didn't make it!

If you are interested in learning how to make a rug out of scraps of fabric, there are many good books available. You can also weave a rug from scraps of fabric. There are lots of books on how to do that too. You can see the books that I have here and here. I also found some free instructions on how to make a rug using yarn. You can see that here

While my rugs have color themes, it isn't necessary to buy extra fabric to make these. If you use scraps, just like you would for a quilt, you can make some really pretty rugs! In addition to fabric scraps, you can use old clothing, old sheets and pillowcases or even old curtains! The only thing you need to keep in mind is the weight of the fabric.  Combine like weights - don't use thick denim pieces with thin tee shirt pieces. 

Here is the rug that needs repair.


If you look in the upper left corner, you can see a piece that appears a bit bigger than the rest of the edging. That is because that is where the edging stitches broke. It broke when I decided to wash it. I was cleaning the bathroom that this rug is in and decided to remove the toilet seat and tank cover, as well as the fabric shower curtain. (I made those too.) So as an afterthought, I picked up the rug and washed all of them together. Everything came out great except the rug! The dark green/red fabric I used on the edging ripped. I apologize that I didn't take a good picture here so you can clearly see it.

The first step to the repair is to remove the stitches to the point where they broke.  For the record, the strips of fabric are about 1 inch wide.


I also could have just hand stitched the two torn ends together and not bothered to remove all the stitching. However, the fabric actually ripped in two spots right next to each other so that is why I decided to rip out the stitches and repair it. 

Now, reconnect the pieces of fabric. The fabric is not sewn together. The two pieces are connected in a unique way. First, cut a tiny slit in each piece of fabric. Then, line up the two cuts you just made. Put one piece of fabric on top of the other. The two ends should be opposite each other so the strip of fabric runs continuously.


Feed the opposite end of the new strip of fabric through both cuts you just made. Pull until the end. This is what you will get.


The new piece of fabric is now connected to the old piece! You can continue to crochet. I made a scalloped finished edge on this rug. To make the scalloped edge, crochet one single stitch, then, crochet three double stitches in the next stitch. Skip a stitch, and repeat.


 Notice the size of the crochet hook? It really is quite large. About 3/4 of an inch thick. Unfortunately, I have had this hook for many, many years and I do not remember the size. It also isn't marked anywhere on the hook. I am sure if you look in one of the craft books you will see some recommended sizes based on the effect you want to achieve.

It took about 20 minutes for me to rework the scalloped edge. Here is the final product that will go back into the bathroom.


I really don't have many commercially made rugs in my house. I made them all myself. Some are crocheted and some are braided twine. Here is a picture of another crocheted one that lives in another bathroom.


Just imagine, in a couple of nights you can make something functional and pretty with scraps of fabric you would have thrown out instead! How frugal is that!

If you don't know how to crochet, I strongly encourage you to learn. It is super easy! Once you start, you will wonder why you waited so long to learn!